面向 Word 用户的快速入门向导
TIP
在阅读本文前,请确保你已经了解了 Typst 是什么并且已经安装了 Typst 的运行环境。
大家能看到这篇文章,或多或少都是因为对于排版或者样式定制有一定的需求。这篇文章将会帮助你快速上手 Typst 并且开始使用 Typst 的排版功能。
Word 是一个开箱即用、所见即所得的软件,而其弊端就在于其排版的不稳定性以及将文章视为「一系列格式各异的元素」。而 Typst 或 LaTeX 相较之下则将文章视为「一系列逻辑结构」,通过定义逻辑结构、约束不同结构的样式来实现排版,将内容的写作与样式的定义分离开来。因此,在使用 Typst 时,更多时候会关注于文章内容结构本身,对于常规的样式则几乎是一个「一劳永逸」的过程(非常规指的是复杂需求的排版,比如绘图、批注等等)。
本文将会介绍 Typst 中的一些常用样式设置,以及如何将 Word 中的样式迁移到 Typst 中。部分内容摘选自小蓝书。
需要补充的知识
set 语法
在本文中,你会多次见到形如 #set A() 的语句。这里的 # 是 Typst 由默认的内容模式进入脚本模式的标志,而 set 允许你设置在这之后 A 元素默认的参数值,它的作用范围从 #set 开始到文档结束。相对应的,直接使用 #A() 并传入一些参数可以构造一个使用这些参数的 A 元素对象,这样就不会影响其他元素的参数值,作用范围是局部的。
与之对应还有 show 语法,在本文中没有怎么出现但实际使用中同样很重要,详见小蓝书的「show」语法部分 和 「set」语法部分。
package
package 就是「包」,在小蓝书中翻译为「库」,是一些由 Typst 社区提供的功能扩展。在 Typst 中,你可以通过 #import 命令引入包,然后使用包中的功能。
字体
在输入一段中文文本后,你可能会发现这样的问题:

由于 Typst 并非由国人设计,它的默认字体并不适合中文排版。因此,我们需要对 Typst 的字体进行一些设置。在文章的开头,我们可以使用 #set text(font: "Noto Serif CJK SC", lang: "zh", region: "CN") 来设置文章正文的字体为「思源宋体」、语言为「中文」、地区为「中国」。这样,我们就可以保证中文的排版效果。如果未安装该字体或想用其它字体,可以参考如何设置(中文)字体。
要调整正文字体的大小,可以使用 #set text(size: 12pt) 来设置字体大小为 12 磅。
#set text(font: "Noto Serif CJK SC", lang: "zh", region: "CN", size: 12pt)在这里,我们使用 set 命令设置文本 text 的参数,传入了 font、lang、region 和 size 四个参数的值。
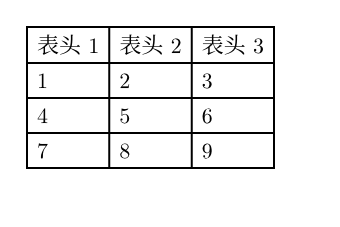
为了与 Word 中的字号相对应,你也可以使用 pointless-size 包,如以下代码所示:
#import "@preview/pointless-size:0.1.2": zh, zihao

#set text(size: zh(5)) // 五号(10.5pt)
在这里,我们引入了 pointless-size 包,并使用了其中的 zh 函数来设置字号。pointless 包中更多的字号与命令的对应请参考下图:

常用的字体设置与装饰
| 设置 / 装饰 | 语法标记 | 对应函数 |
|---|---|---|
| 粗体 | *粗体* | #strong[粗体] |
| 斜体 | _斜体_ | #emph[斜体] |
| 下划线 | / | #underline[下划线] |
| 删除线 | / | #strike[删除线] |
| 下标 | / | #sub[下标] |
| 上标 | / | #super[上标] |
| 文本高亮 | / | #highlight[高亮] |
| 文本颜色 | / | #text(fill: red)[红色文本] |
其中,#text(fill: red)[红色文本] 可以设置文本的颜色,red 可以替换为其他颜色,如 blue、green 等。fill 参数接收的是一个颜色,可以参考小蓝书中有关颜色的介绍。#highlight(fill: yellow)[高亮] 可以设置文本的背景色,yellow 可以替换为其他颜色,这个是同理的。
Word 原生提供了伪粗体和伪斜体的功能,但 Typst 原生并不默认支持,而是直接使用字体文件中已有的不同样式和字重。中文字体并不一定提供了粗体和斜体的变体,因此在使用粗体和斜体时可能会出现问题。详情请参考:
而对于下划线,可能出现以下问题:
TIP
官方的文本高亮实现不够完善,存在一些不好解决的问题,后续版本可能会修复。
段落
Typst 使用空行来分隔段落。如下面的例子所示:
这是第一个段落。
这里没有空行,所以这句话和上一句在同一个段落中。
Another one
bites the dust.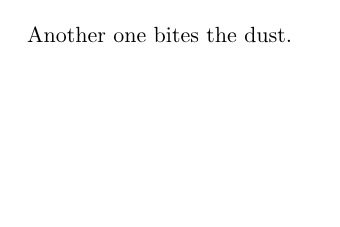
TIP
上面的例子中,换行会产生一个空格,对于 CJK 而言这不是一个正确的行为,可能会在后续版本中修复。
这是第一个段落。

这里有一个空行,所以这句话和上一句在不同的段落中。
而如果需要强制换行而不划分段落,可以使用 \(即 #linebreak()),等价于 Word 中的 Shift+Enter 快捷键:
这是第一行。\
这是第二行。
连续的空格会被合并为一个空格。
A     B
// 会输出为 A B
TIP
有关段落可进一步参考小蓝书相关章节。
对齐方式
在 Typst 中,如果需要设置局部的对齐方式,可以使用 #align(left)[左对齐]、#align(right)[右对齐]、#align(center)[居中]。
文字默认是左对齐的。

#align(center)[但我想临时居中!]

而不影响其他文字。
使用 #set align(left)、#set align(right)、#set align(center) 来设置之后所有文本的对齐方式。
#set align(left)
这行字左对齐

#set align(right)
这行字右对齐

#set align(center)
这行字居中
在 Word 的工具栏中,还有两种对齐方式,分别是两端对齐和分散对齐。在 Typst 中,两端对齐由段落的 justify 参数控制。由于断行算法不一样,同样的字体设置下,在 Word 和 Typst 的断行位置不一定一致,可能会影响论文模板精确复现。
#set par(justify: false)
This is a 中英文混排段落,如果 not 使用 `justify` 参数,将会默认为左对齐。而这 maybe 会很 ugly。

#set par(justify: true)
This is a 中英文混排段落,如果 not 使用 `justify` 参数,将会默认为左对齐。而这 maybe 会很 ugly。

而分散对齐请参考:如何实现分散对齐?
段落缩进
段落的缩进可分为首行缩进和整段缩进。首行缩进是指段落的第一行缩进,而整段缩进是指段落的所有行都缩进。在 Typst 中,分别由 par 的 first-line-indent 和 hanging-indent 参数控制。
列表
在 Typst 中,列表分为有序列表和无序列表。无序列表使用 - 开头,用缩进表示层级关系。有序列表使用显式的编号 1. 或 + 开头,用缩进表示层级关系。
+ 一级列表项 1
  - 二级列表项 1.1
    + 三级列表项 1.1.1
  - 二级列表项 1.2
+ 一级列表项 2
  - 二级列表项 2.1

列表间插入一段描述,列表项 3 被吃掉了。

4. 列表项 4
+  列表项 5
+  列表项 6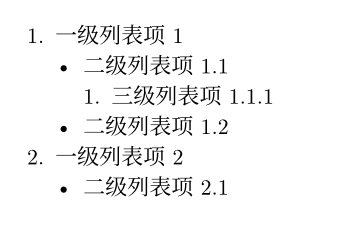
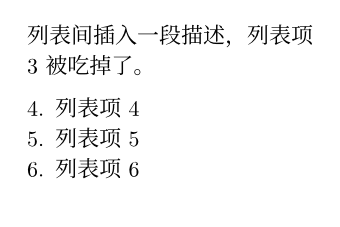
默认列表使用紧凑模式。而列表各行之间可以插入空行,这样列表就会变得没那么紧凑。
行距和段距
在 Typst 中,行距和段距分别由 par 的 leading 和 spacing 参数控制。行距是指行与行之间的距离,段距是指段与段之间的距离。如图所示。
四千年來時時喫人的地方,今天纔明白,我也在其中混了多年;大哥正管着家務,妹子恰恰死了,他未必不和在飯菜裏,暗暗給我們喫。

我未必無意之中,不喫了我妹子的幾片肉,現在也輪到我自己,……

有了四千年喫人履歷的我,當初雖然不知道,現在明白,難見眞的人!

沒有喫過人的孩子,或者還有?

救救孩子……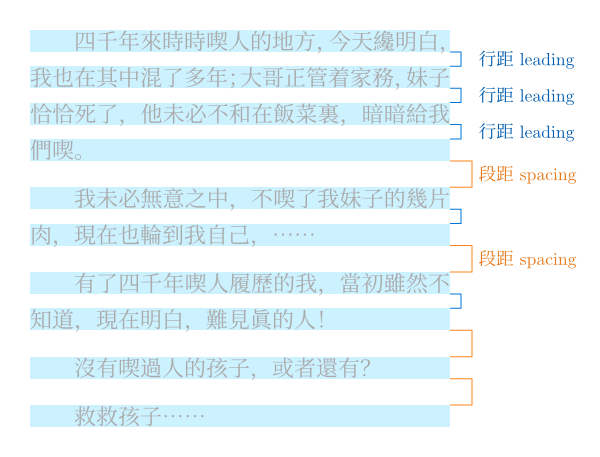
“行”的定义牵涉文字外框,可通过 text 的 top-edge、bottom-edge 调整。
#set par(leading: 0.6em, spacing: 1em)
#set box(fill: aqua)

= 西文习惯(默认)

#set text(top-edge: "cap-height", bottom-edge: "baseline")
#box[Typst 国王] \
#box[Typst 国王]

= 中文习惯

#set text(top-edge: "ascender", bottom-edge: "descender")
#box[Typst 国王] \
#box[Typst 国王]
请注意 Word 与 Typst 的行距模型存在不少差异。如果你想复现 Word 设置,建议不纠结换算公式,而是写满一页纸,然后调整 leading 数值,让每页的行数符合预期。
Word 与 Typst 行距模型的若干具体差异
- Word 中“页面设置 → 文档网格”默认指定行网格,而“段落设置 → 间距”又默认启用对齐到网格。所以默认设置下,Word 会把每行字四舍五入到最近的行网格,导致行距的实际值未必等于设置值,甚至可能前后变化。而 Typst 中没有类似机制,行距设置多少实际就是多少。
- Word 设置中所谓“行距”其实是行高,行高 = 文字尺寸 + 行距。因此,“固定值 22 磅”大致对应 Typst 中的
set par(leading: 22pt - 1em),而非set par(leading: 22pt)。 - Word 中“单倍行距”与文字尺寸的比值依赖于字体,有时甚至还依赖于操作系统,实际在 1.14 与 1.92 间浮动。而 Typst 中
1em始终等于汉字尺寸。 - ……
TIP
有关长度单位的介绍请参考小蓝书的度量与布局。你可以简单理解成 em 就是当前上下文中一个字的长度,历史上曾定义 M 的宽度为 1em,但实际情况下并不一定完全相等。当然以下例子中的行距和段距也可以使用绝对单位,如 12pt、1cm 等。
字间距和词间距
使用 text 的 tracking 参数可以设置字符间距,spacing 参数设置词间空格宽度。
#text(spacing: 20pt)[#lorem(5) 设置文本的 spacing 属性对中文无效。]

#text(tracking: 2pt)[#lorem(5) 而设置 tracking 属性对中文有效。]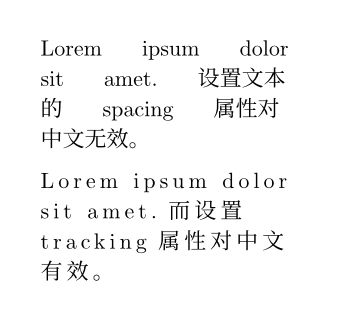
水平方向或竖直方向的空白
使用 #h(e.g., #h(1em))可以插入水平方向的空白,而使用 #v(e.g., #v(1em))可以插入竖直方向的空白(会导致强制换行)。
这里有一些空白:#h(1em)这里有一些空白。

这里有一些空白:#v(1em)这里有一些空白。
借助这个特性,我们可以实现一些行内的等分排列:
左 #h(1fr) 右
#v(1fr)
左 #h(1fr) 中 #h(1fr) 右
这里的 fr 表示比例,它也是一个相对单位,在同一个部分的 fr 会按照不同的比例平分剩余的空间,因此同样的系数平分的空间是相等的。有关相对长度可见小蓝书的解释。
竖排
暂无官方支持,但是可以使用一些魔法来实现简单的竖排效果。
标题
使用一个或多个连续的等于号(=)开启一个标题。不同数量的等于号划分了标题的层级、对应其在 Word 大纲中的级别。
TIP
如果你使用过 Markdown,可能会发现 Markdown 中通常将一级标题视为文档属性的标题(在最开头且唯一),而 Typst 中的一级标题可以有多个,可表示语义上的“章节”。
对于全文的标题,使用 #set document(title: "文档标题") 来设置文档属性。开头的大标题可以用 #heading(outlined: false)[文档标题] 实现。
= 一级标题
我走了。
== 二级标题
我来了。
=== 三级标题
我走了又来了。
要设置标题的样式,需要使用 show 或者 set 命令。
标题编号
Typst 的标题编号是自动的,可以通过修改 heading 的 numbering 参数来设置编号的格式。numbering 传入一个字符串,它会解析其中的各级编号和分隔符。
#set heading(numbering: "1.a.i")
= 一级标题
我走了。
== 二级标题
我来了。
== 二级标题
我来了吗?
=== 三级标题
我走了又来了。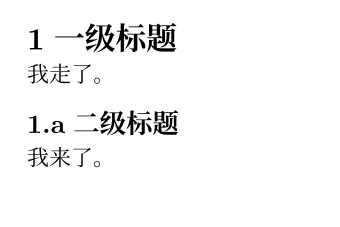

但这里官方的编号实现会有一些问题,例如当传入 "chapter" 时,它可能会将其中的 a 解析为编号造成一些难绷的结果。此外,它对于全角符号的支持并不好,比如:
#set heading(numbering: "一、1.a.i")
= 一级标题
我顿号没了。
== 二级标题
我也没了。
况且,如果需要不同级别的标题分别使用不同的编号,官方的实现也无法简单实现。因此,推荐使用群友科技 numbly 包来解决这个问题。
#import "@preview/numbly:0.1.0": numbly
#set heading(numbering: numbly(
  "{1:一}、",
  "{2:1}.",
  "{3:a}.",
  "{4:i}.",
))
= 一级标题
我走了。
== 二级标题
我来了。
== 二级标题
我来了吗?
=== 三级标题
我走了又来了。

仍存在的问题是,顿号后有一个代码中写死的一小段空格(长度为 0.3em),请参考如何去掉标题的编号后面的空格?。
插入非文本元素
表格
在 Typst 中插入表格基本的语法是:
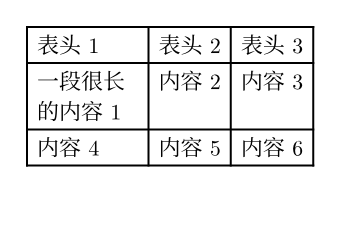
#table(
    columns: 3, // 列数
    table.header([表头 1], [表头 2], [表头 3]), // 表头
    [一段很长的内容 1], [内容 2], [内容 3], // 第一行
    [内容 4], [内容 5], [内容 6], // 第二行
)
其中 columns 参数是必须的,它可以传入一个数字,表示表格的列数,也可以传入一系列的长度,表示每一列的宽度。比如下面这个例子实现了各列宽度相等的三列表格:
#table(
    columns: (1fr, 1fr, 1fr),
    table.header([表头 1], [表头 2], [表头 3]),
    [一段很长的内容 1], [内容 2], [内容 3],
    [内容 4], [内容 5], [内容 6],
)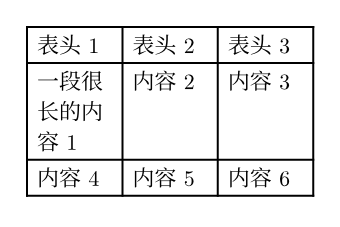
类似的,也可以传入 rows 参数,表示表格的行数和行高,但是这个参数并不是必须的,因为 Typst 会自动根据内容的多少来自动向下延伸表格。
table.header() 表示表头的内容,当一个表格跨页的时候,它会在每一页的表格上方显示。
#table(
    columns: 3,
    table.header([表头 1], [表头 2], [表头 3]),
    ..for i in range(1, 19) { ([#i],) }
)
关于常用的表格设置,可以参考如何实现三线表?。
如果需要导入外部的 Excel 表格,可以使用群友科技 rexllent 包。如果使用 VSCode 并且已经安装了 tinymist,你可以试试直接将 Excel 表格拖入编辑器中。
图片
使用 #image 命令插入图片:
#image("这里填路径", width: 100pt, height: 100pt)width 和 height 参数可以设置图片的宽度和高度。如果只设置其中一个,另一个会按照图片的比例自动调整。这两个参数都不是必须的,如果不设置,图片会按照原始大小或最大页面宽度自动调整。
需要注意的是,Typst 不支持插入网络图片,只能插入本地图片。如果你需要插入网络图片,可以先下载到本地,然后再插入。
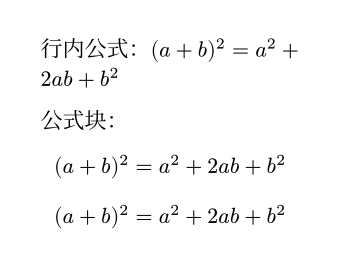
数学公式
Typst 的数学公式用一对 $ 包裹。当 $ 内侧有空白(空格或换行符)时为行间公式(e.g.,$ a $),否则为行内公式。
行内公式:$(a+b)^2 = a^2 + 2 a b + b^2$

公式块:
$ (a+b)^2 = a^2 + 2 a b + b^2 $

$
(a+b)^2 = a^2 + 2 a b + b^2
$
关于 Typst 的数学公式语法,与 LaTeX 相比,可以试试以下步骤:
- 将 LaTeX 公式中的
\frac改为/,如\frac12改为1/2。在 Typst 中,/通常会显示成水平的分数线,如果需要写成斜杠,可以使用\/进行转义或者使用群友科技 slashion 包。 - 将 LaTeX 公式中的不同元素用空格分隔,如
2ab在 Typst 中应该写为2 a b。 - 许多在 LaTeX 中需要反斜杠才能引出的符号在 Typst 中可以直接输入,参见小蓝书的常用数学符号。
这一部分建议还是多看看官方文档的 math 部分,三言两语不太容易说清。
如果已经习惯了 LaTeX 写法无心改变,可以尝试使用 mitex 包来写入 LaTeX 公式。或者使用 detypstify 或群友科技 typress 识别公式、输出 Typst 代码。
代码
和 Markdown 类似,使用反引号(`)包裹代码:
`print("Hello, world!")`
如果需要插入代码块,可以使用三个反引号:
```typst
#text(fill: red)[红色文本]
```
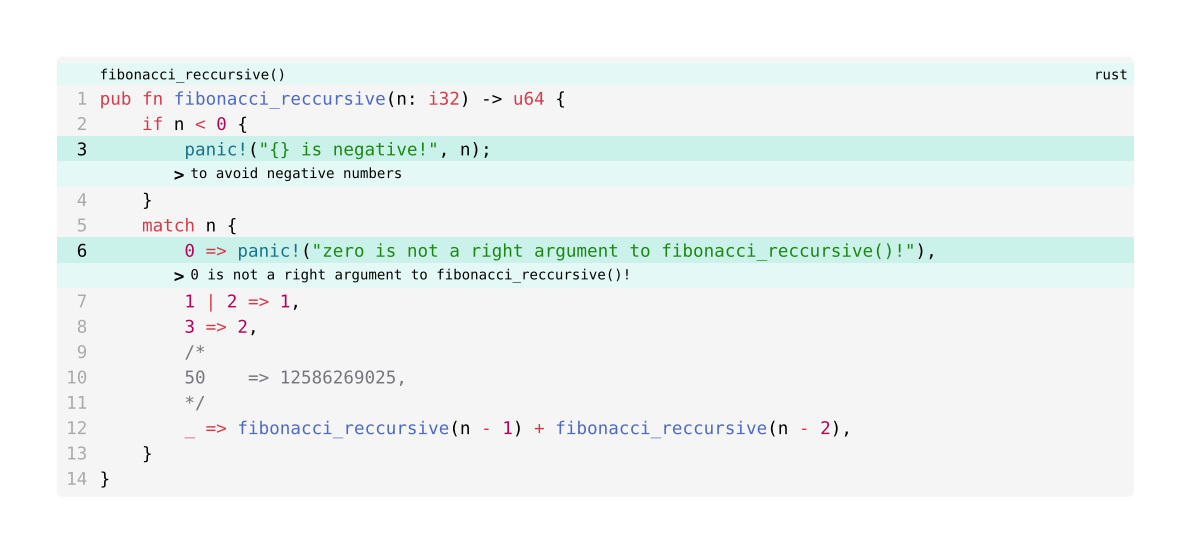
自定义代码块的样式(比如行号)需要使用 show 或者 set 命令。或者,你也可以使用社区提供的代码美化包,比如:
#import "@preview/zebraw:0.3.0": *
#show: zebraw
#zebraw(
  highlight-lines: (
    (3, [to avoid negative numbers]),
    (6, [0 is not a right argument to fibonacci_reccursive()!]),
  ),
  header: "fibonacci_reccursive()",
  ```rust
  pub fn fibonacci_reccursive(n: i32) -> u64 {
      if n < 0 {
          panic!("{} is negative!", n);
      }
      match n {
          0 => panic!("zero is not a right argument to fibonacci_reccursive()!"),
          1 | 2 => 1,
          3 => 2,
          /*
          50    => 12586269025,
          */
          _ => fibonacci_reccursive(n - 1) + fibonacci_reccursive(n - 2),
      }
  }
  ```,
)
图形
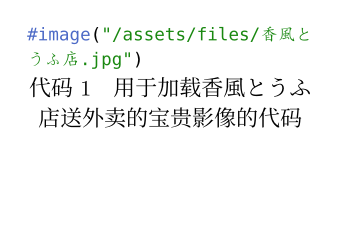
可以通过 figure 函数为图像或任意内容设置标题:
#set text(lang: "zh", region: "cn") // 用于将默认的 supplement 改为中文
#figure(
  ```typ
  #image("/assets/files/香風とうふ店.jpg")
  ```,
  caption: [用于加载香風とうふ店送外卖的宝贵影像的代码]
)

#figure(
  table(
    columns: 2,
    [A], [B],
  ),
  caption: "一个简单的表格",
)

链接
Typst 会自动识别文中的 HTTPS 和 HTTP 链接文本并创建链接。手动使用 #link[链接文本] 可以创建一个链接。
#show link: set text(fill: blue) // 设置链接的颜色为蓝色

https://zh.wikipedia.org

#link("https://zh.wikipedia.org")[维基百科]
在 Typst 中,可以通过创建标签标记任意内容。要引用该标签,可以使用 @ 或者 #link(<标签名>)。
#show link: set text(fill: blue) // 设置链接的颜色为蓝色
#show ref: set text(fill: red) // 设置引用的颜色为红色

#figure(
  table(
    columns: 2,
    [A], [B],
  ),
  caption: "一个简单的表格",
)<table1>

== 一个神秘标题 <mystery>

@table1 后面讲述了#link(<mystery>)[一个神秘标题]。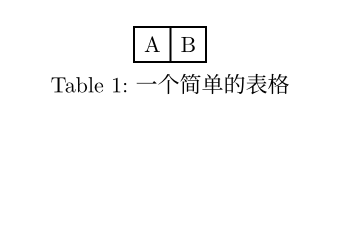

参考文献、脚注与引用
Typst 使用 #bibliography 命令来插入参考文献。在文中引用参考文献时,使用 #cite 命令。
例子暂无。使用 #footnote 命令来插入脚注。
在任意地方使用 ```typ #footnote``` 来插入一个脚注。比如这里#footnote[这个地方就是一个脚注]就是一个脚注。脚注会#footnote[自动编号]自动编号。
页面
Typst 的页面默认是 A4 纸,纵向排列,页边距为 2.5cm。如果需要设置页面的大小、方向、页边距,可以使用 #set page 命令。
TIP
每次 #set page 都会产生一个新页。
下面例子中的灰色框是版心轮廓。
#set page(paper: "a4")
#rect(width: 100%, height: 100%, stroke: gray)
大小、方向与页边距
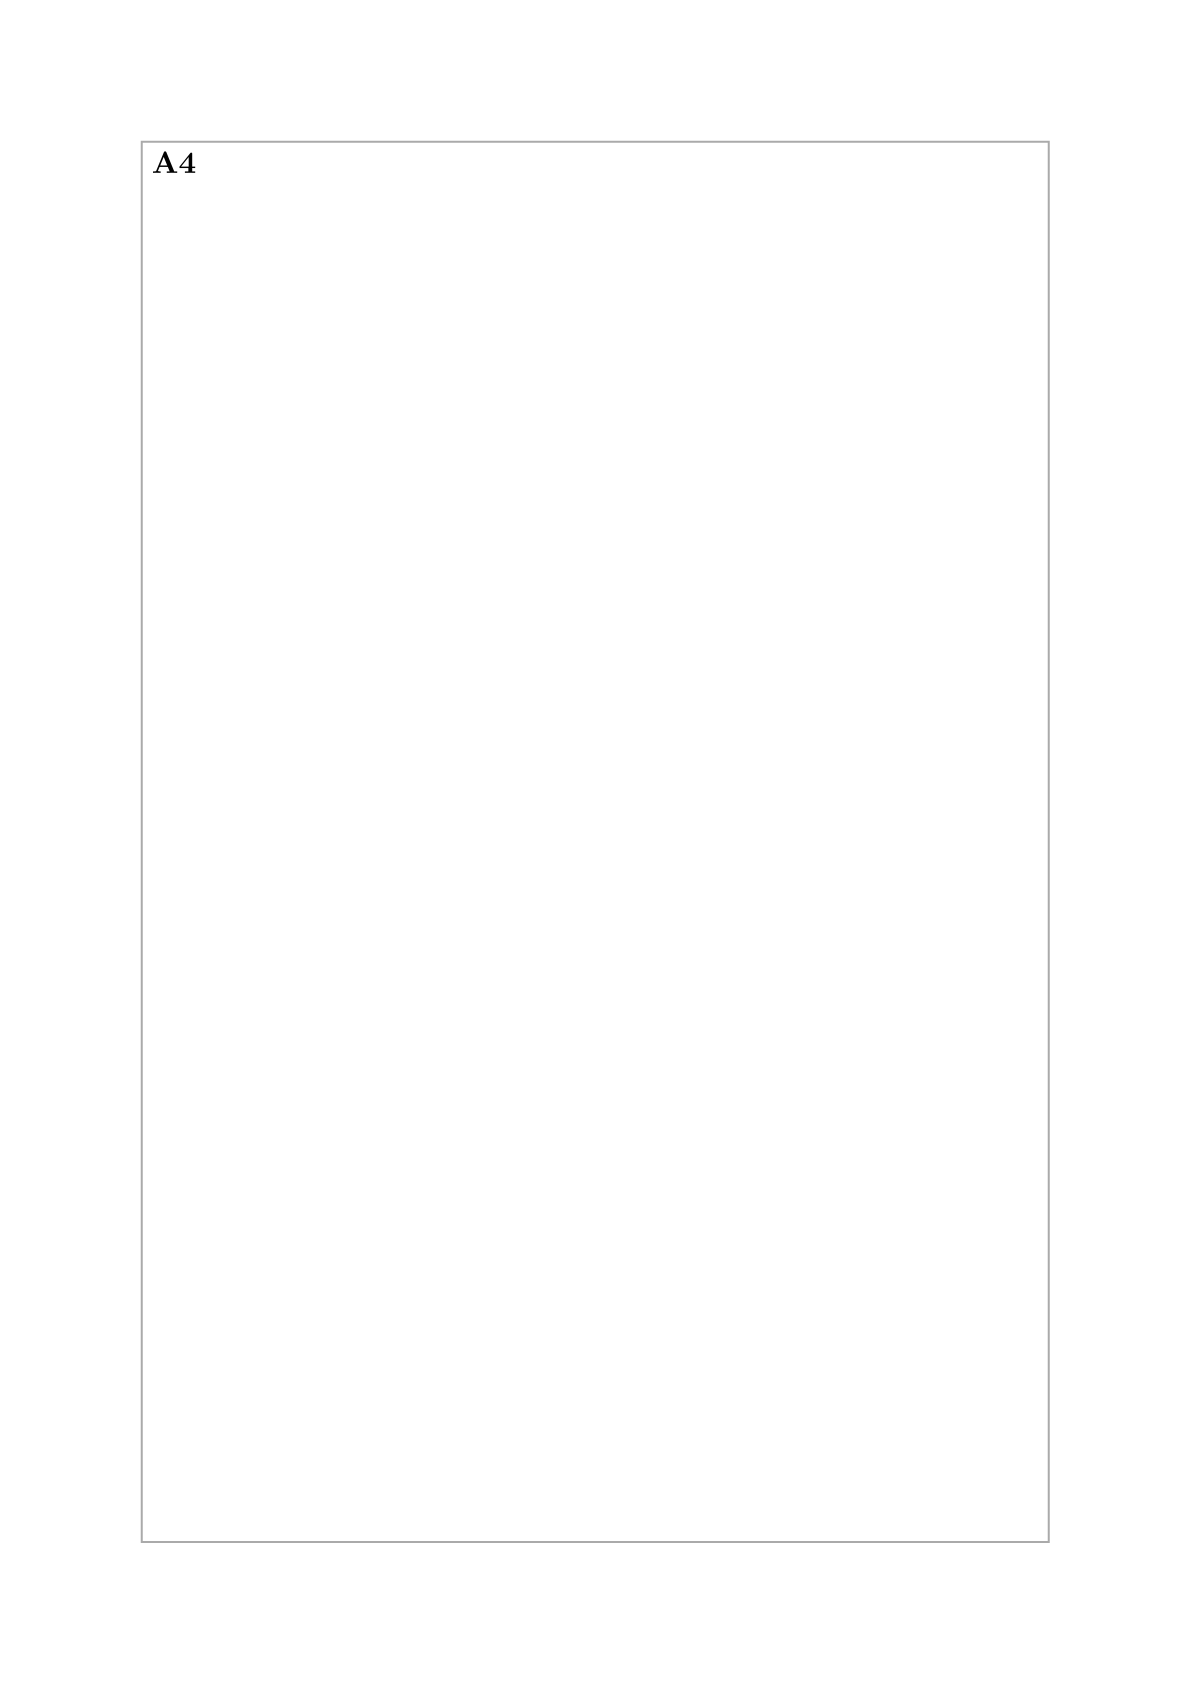
使用预设的各种 paper 传入 paper 参数,可以设置页面的大小。flipped 参数可以让页面横向。
#page(paper: "a5", flipped: true)[#rect(width: 100%, height: 100%, stroke: gray)[= A5]]
#page(paper: "a4")[#rect(width: 100%, height: 100%, stroke: gray)[= A4]]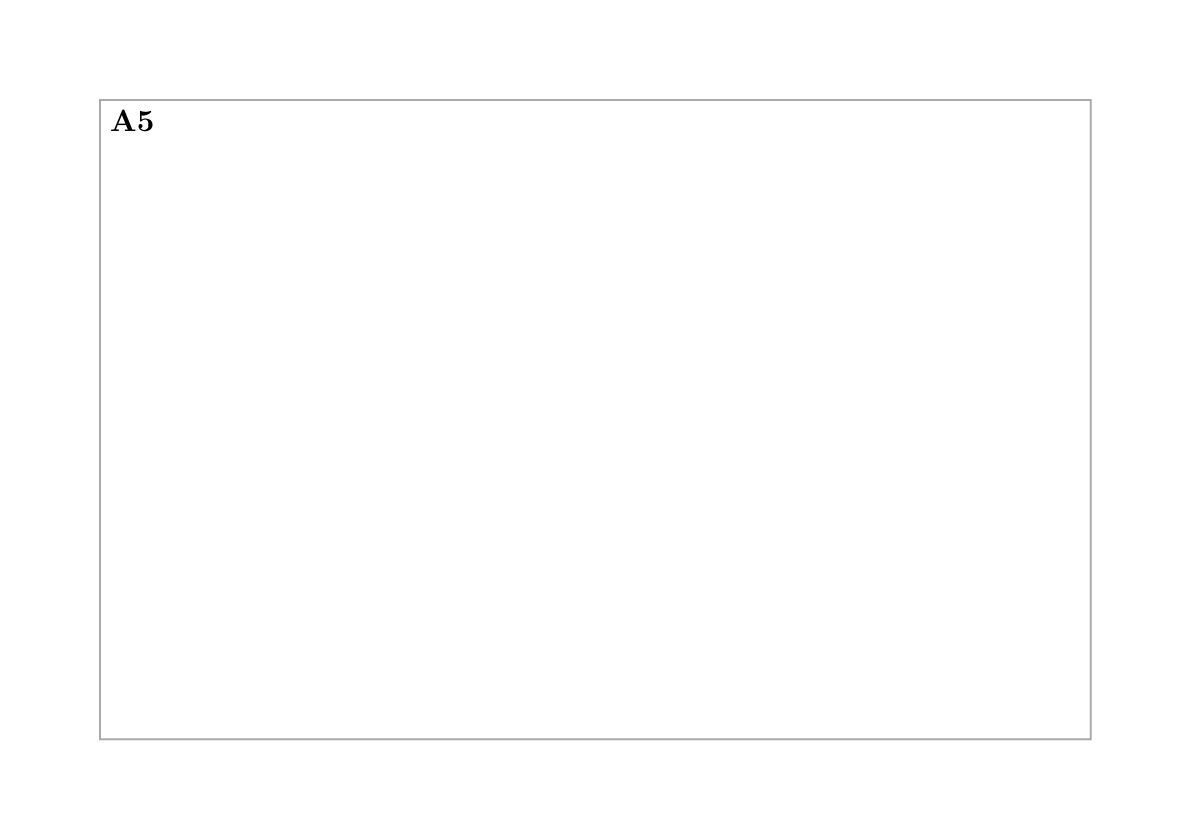
可以使用 width 和 height 参数来设置页面的宽度和高度。如果没有指定纸张类型,则会在预设的 "a4" 基础上修改参数。设置为 auto 时,页面的宽度或高度会自动调整,不会自动分页。
滚滚长江东逝水,浪花淘尽英雄。是非成败转头空。青山依旧在,几度夕阳红。\
白发渔樵江渚上,惯看秋月春风。一壶浊酒喜相逢。古今多少事,都付笑谈中。
// v.s.
#set page(height: auto)
滚滚长江东逝水,浪花淘尽英雄。是非成败转头空。青山依旧在,几度夕阳红。\
白发渔樵江渚上,惯看秋月春风。一壶浊酒喜相逢。古今多少事,都付笑谈中。


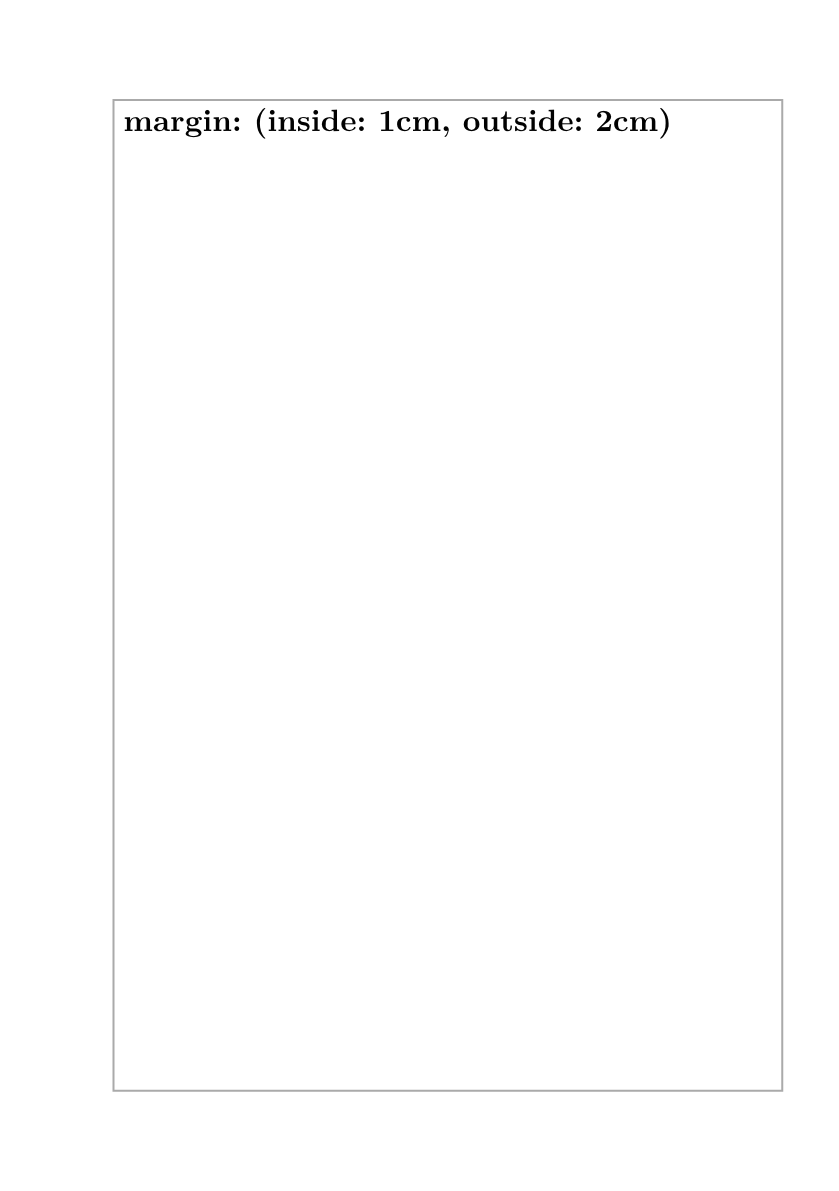
同理,可以使用 margin 参数来设置页边距。这个参数传入的值比较多样:
当传入一个长度值时表示四边的页边距都是这个值。
typst#set page(paper: "a5", margin: 1cm) #rect(width: 100%, height: 100%, stroke: gray)[= margin: 1cm]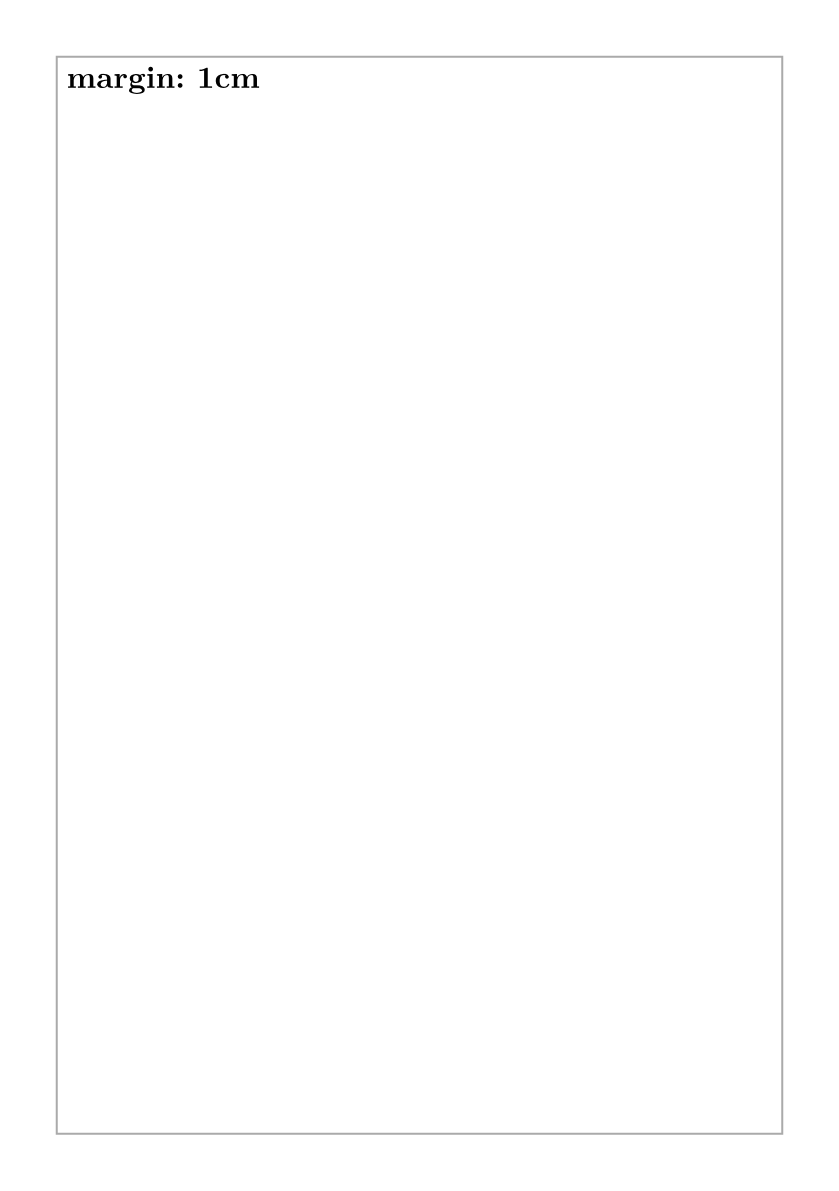
传入一个字典,指定上下左右方向的页边距。当然也是传什么才修改什么,不传的话就不会修改(默认是 2.5cm)。
typst#set page(paper: "a5", margin: (top: 1cm, bottom: 2cm, right: 4cm)) #rect(width: 100%, height: 100%, stroke: gray)[= margin: (top: 1cm, bottom: 2cm, right: 4cm)]
传入一个字典,指定水平方向和竖直方向的页边距。
typst#set page(paper: "a5", margin: (x: 1cm, y: 2cm)) #rect(width: 100%, height: 100%, stroke: gray)[= margin: (x: 1cm, y: 2cm)]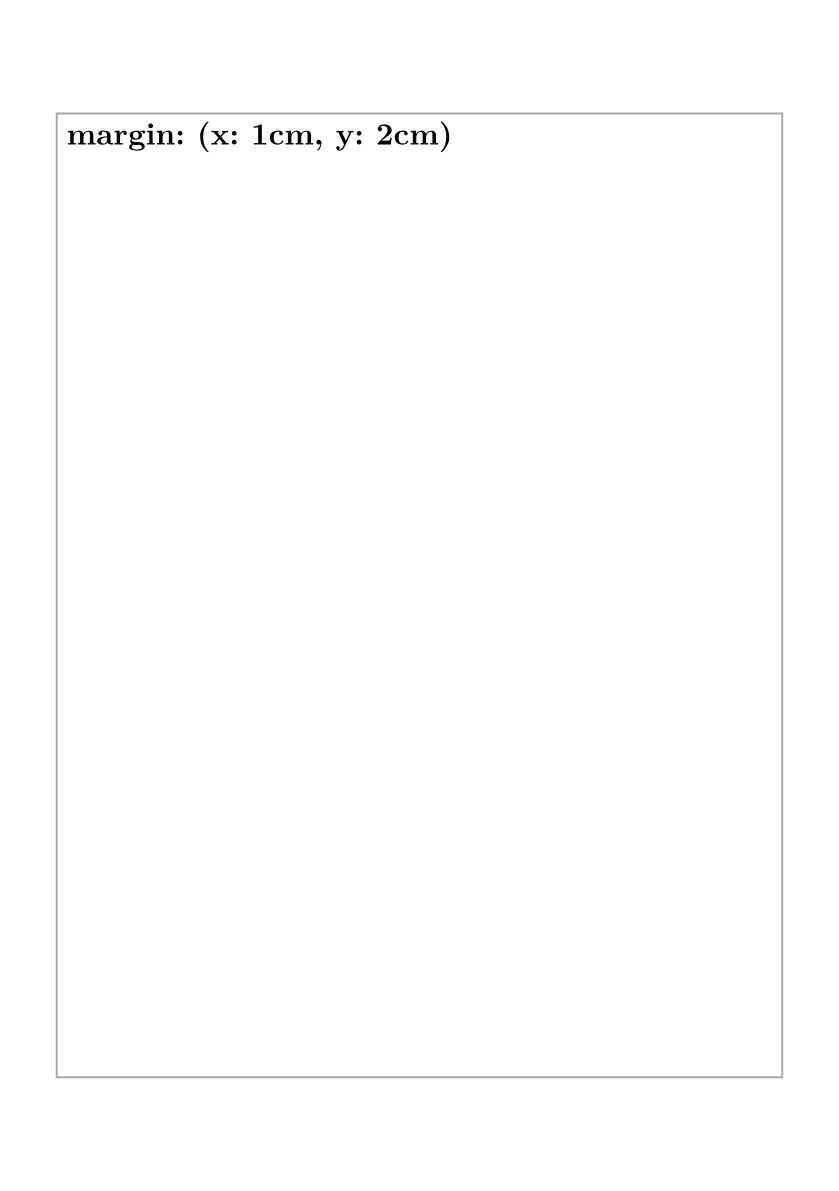
传入一个字典,指定页面内侧和外侧的页边距。内侧和外侧即相对装订而言,装订线的一侧是内侧,另一侧是外侧。奇数页的内侧是左侧,偶数页的内侧是右侧。
typst#set page(paper: "a5", margin: (inside: 1cm, outside: 2cm)) #rect(width: 100%, height: 100%, stroke: gray)[= margin: (inside: 1cm, outside: 2cm)] #rect(width: 100%, height: 100%, stroke: gray)[= margin: (inside: 1cm, outside: 2cm)]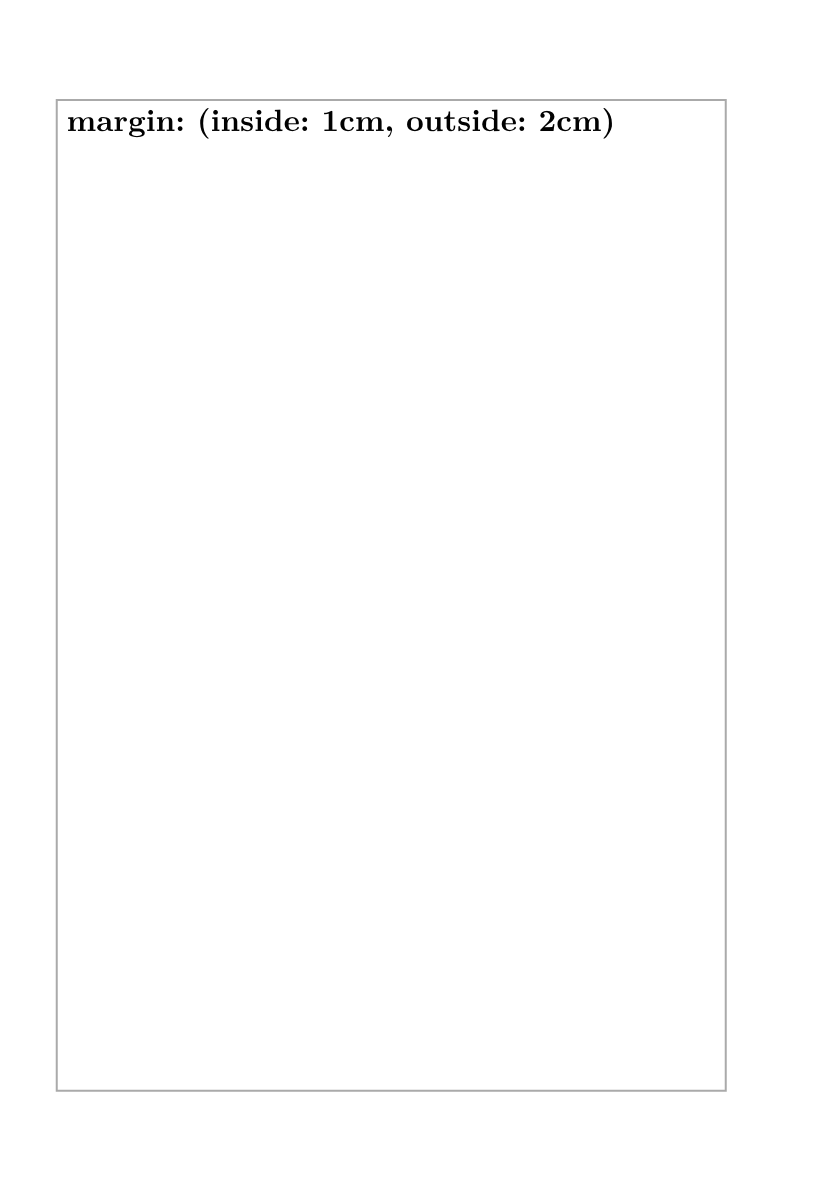
页眉、页脚与页码
通过传入 header 和 footer 参数可以设置页眉和页脚。页眉和页脚的内容可以是任意的 Typst 内容。
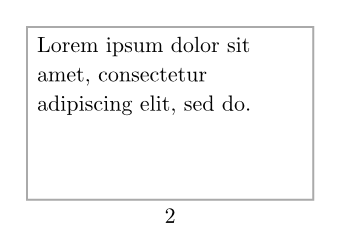
如果指定了 page 的 numbering 参数,页码会自动显示在页脚中。使用 #counter(page).update(1) 可以手动更新页码。
#set page(numbering: "1")

#rect(width: 100%, height: 100%, stroke: gray)[#lorem(10)]

#rect(width: 100%, height: 100%, stroke: gray)[#lorem(10)]

#counter(page).update(1)

#rect(width: 100%, height: 100%, stroke: gray)[#lorem(10)]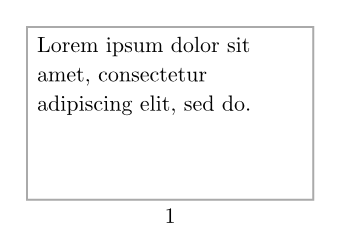
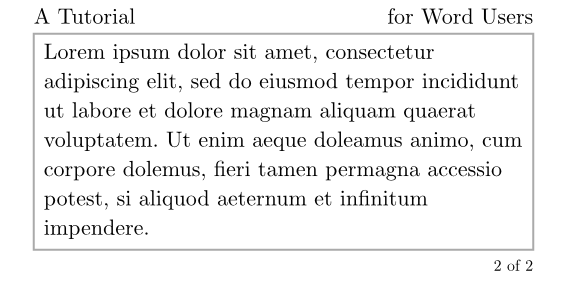
也可以手动操控页码在页脚的显示方式:
#set page(
  height: 5cm,
  width: 10cm,
  header: [A Tutorial #h(1fr) for Word Users],
  footer: context [
    #set align(right)
    #set text(8pt)
    #counter(page).display(
      "1 of 1", // 类似 numbering 的写法
      both: true, // 既显示当前页数,也显示总页数
    )
  ],
)

#rect(width: 100%, height: 100%, stroke: gray)[#lorem(40)]
#rect(width: 100%, height: 100%, stroke: gray)[#lorem(40)]
分栏
使用 columns 参数可以将页面分为多栏。
#set page(columns: 2)
滚滚长江东逝水,浪花淘尽英雄。是非成败转头空。青山依旧在,几度夕阳红。
白发渔樵江渚上,惯看秋月春风。一壶浊酒喜相逢。古今多少事,都付笑谈中。
背景
使用 background 参数可以设置页面的背景,传入的是任意的内容。使用 fill 参数可以设置页面的背景颜色。
#set page(
  fill: black,
  background: rotate(
    24deg,
    text(18pt, fill: rgb("FFCBC4"))[
      *I AM WATCHING U*
    ],
  ),
)
#set text(white)
孩子们好久不见!
空白页与分页
一个空白页其实就是调用 #page[] 函数传入一个空白内容。
滚滚长江东逝水,浪花淘尽英雄。是非成败转头空。青山依旧在,几度夕阳红。
白发渔樵江渚上,惯看秋月春风。一壶浊酒喜相逢。古今多少事,都付笑谈中。
#page[]
滚滚长江东逝水,浪花淘尽英雄。是非成败转头空。青山依旧在,几度夕阳红。
白发渔樵江渚上,惯看秋月春风。一壶浊酒喜相逢。古今多少事,都付笑谈中。

当然,像前面的例子所示,这个页面也可以有各种各样的内容。
滚滚长江东逝水,浪花淘尽英雄。是非成败转头空。青山依旧在,几度夕阳红。
白发渔樵江渚上,惯看秋月春风。一壶浊酒喜相逢。古今多少事,都付笑谈中。
#page(
  fill: black,
  background: rotate(
    24deg,
    text(18pt, fill: rgb("FFCBC4"))[
      *I AM WATCHING U*
    ],
  ),
)[#set text(white)
  孩子们好久不见!]
滚滚长江东逝水,浪花淘尽英雄。是非成败转头空。青山依旧在,几度夕阳红。
白发渔樵江渚上,惯看秋月春风。一壶浊酒喜相逢。古今多少事,都付笑谈中。
通常要分页而不是插入一个页面的时候,只需调用 #pagebreak() 函数即可。
滚滚长江东逝水,浪花淘尽英雄。是非成败转头空。青山依旧在,几度夕阳红。
白发渔樵江渚上,惯看秋月春风。一壶浊酒喜相逢。古今多少事,都付笑谈中。
#pagebreak()
滚滚长江东逝水,浪花淘尽英雄。是非成败转头空。青山依旧在,几度夕阳红。
白发渔樵江渚上,惯看秋月春风。一壶浊酒喜相逢。古今多少事,都付笑谈中。 Y.D.X.
 梦飞翔
梦飞翔 Copilot
 Hong Jiarong